After you’ve learned how to fly and you can easily handle your airplane and fly it straight and level, you’ll soon start looking for more challenges to regain the excitement that you felt in the beginning. Learning the basic of aerobatics is the best way to up the excitement and, while you’re at it, increase your piloting skills and precision. This article will introduce you to three basic maneuvers any inspiring aerobatic pilot will need to know. After mastering these, you’ll be able to string various segments of these and make your own advanced showstopping moves. But first, let’s see what’s needed.
Getting Started
Aerobatic airplanes need to have a good power-to-weight ratio, with enough power not only to perform your chosen maneuvers but also to fly out of problem situations. As with all airplanes, your servos should have the recommended torque and be installed securely. All of your plane’s control surfaces should be set up and hinged correctly and, of course, move in the proper directions. The model’s center of gravity (CG) should be set at the recommended position; remember, a model that is balanced with a slightly tail-heavy CG may be more desirable for aerobatics flown by experienced pilots.
High-wing trainer and sport aircraft can do basic aerobatics, but for more advanced maneuvers, a shoulder-wing or low-wing plane is preferable.
Maneuvers
Here are the three basic aerobatic maneuvers: the inside loop, the roll, and a combination of the two—an Immelmann turn. These create a solid foundation on which to build your future aerobatic routines.
Inside Loop
In an inside loop, the plane’s canopy faces toward the center of the loop during the maneuver.
This move requires that you are proficient with basic straight and level flight.
Graceful, smooth flying is your key to success for this classic move.
BY THE NUMBERS
STEP 1
Enter the maneuver flying parallel to the runway in upright and level flight.
STEP 2
When the plane is directly in front of you, gently pull the elevator stick back (up) to begin the loop. You might need to increase throttle to maintain maximum power as the model nears the top of the loop to maintain a constant flight speed.
STEP 3
Start decreasing throttle as the plane begins to come over the top of the loop. When you are on the downward segment, the throttle should be close to idle. Continue to adjust up-elevator to maintain a perfectly round loop.
STEP 4
As the model approaches the last quadrant of the loop, release elevator input so that the plane maintains the same altitude as it entered the maneuver while flying upright.
STEP 5
Increase power to 60 percent after your model passes your center. Exit straight and level in upright flight.
PRO TIPS
• Elevator plays a major part in flying a loop. Make all of your inputs gradually and smoothly because the model will reflect all of your inputs.
• If you find that your model’s heading is drifting during the maneuver, apply rudder inputs to keep its flight path parallel to the runway.
• Keep your radio on low rates throughout the outside loop.
The Roll
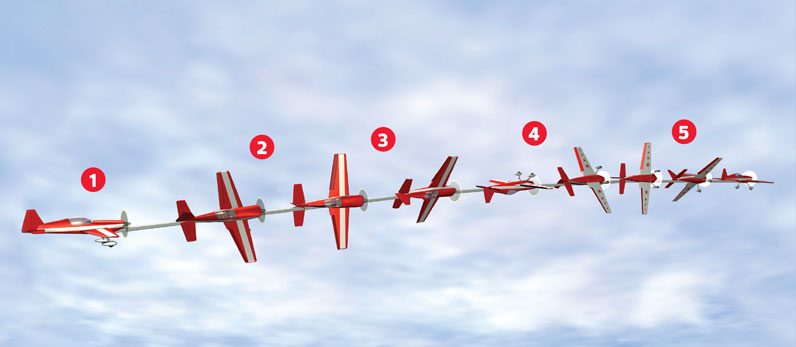
BY THE NUMBERS
Because the roll is used in so many other maneuvers, it’s important to perfect it and add it to your foundation repertoire. High speed rolls are generally easier to start with because inertia is a tremendous help. Long, graceful rolls are usually done at medium to high speed to allow inertia to help keep the maneuver axial. Keep the midsection of the roll (when the plane is directly inverted) centered on your position.
BY THE NUMBERS
STEP 1
Begin the maneuver by flying straight and level either into the wind or downwind, then initiate the roll with a little aileron (constantly maintain that throughout the maneuver).
STEP 2
As the roll begins, apply rudder to maintain a straight and level heading. (If the roll is to the right, use left rudder and vice versa.) The maximum amount of rudder will be required when the wing reaches vertical (knife-edge).
STEP 3
As the plane continues to roll past vertical, start to ease off on the rudder and begin to apply down-elevator until the plane is inverted. At this point, you should have no rudder input, and you should have applied the maximum down-elevator input needed to maintain level flight.
STEP 4
As the roll continues, begin to ease off elevator and apply the appropriate rudder (at this point, right rudder for a roll to the right) to maintain altitude as the plane rolls around again to wings vertical (knife-edge). When the wing is in the second vertical position, the plane should again have the maximum amount of rudder to maintain level flight, with no elevator input necessary.
STEP 5
Continue the roll until the plane is again in the upright position. Slowly release the rudder stick so that there is no rudder input when the plane reaches its upright and level position. Exit the maneuver at the same altitude at which you started.
PRO TIPS
• Problems can occur if you push too much down-elevator as the plane is inverted.
• Another frequent error is pushing the elevator stick too soon, while the plane is right side up, or not releasing the elevator quickly enough as the plane rolls back over.

Immelman Turn
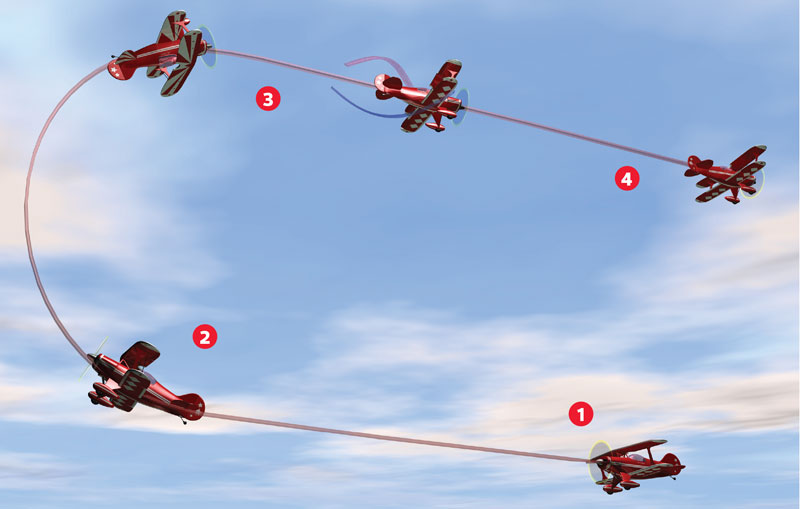
Originally a combat maneuver developed to change heading 180 degrees and gain altitude quickly, this maneuver has become one of the most recognizable turnaround moves in aerobatics. It is actually a half loop followed by a half roll. You usually enter an Immelmann turn when you are flying into the wind. It is also a perfect transition from a low exit maneuver to a high-entry maneuver.
BY THE NUMBERS
STEP 1
Begin the maneuver flying straight and level at half throttle.
STEP 2
Pull back on the elevator, and begin a half loop while controlling your tracking with rudder.
STEP 3
When you are inverted directly above the starting point, execute a half roll so that the plane is flying in the opposite direction in which it started and at a higher altitude.
STEP 4
Maintain straight and level flight, and exit the maneuver.
PRO TIPS
• When you are comfortable with this maneuver, start matching the speed of the half roll to the height of the half loop. If your half roll is short, slow down the half roll to add symmetry to the two components.
• A tight half loop will make the maneuver much smaller but will provide greater exit speed. Keep this in mind if you’re using the Immelmann turn as a transition and your next maneuver requires a higher entry speed.

By John Glezellis
Photo by Gerry Yarrish | Illustrations by FX Models

